
I have been looking for an imaging telescope with a medium focal length (800-1000mm) which was also a fast optical design. The TEC 140 APO refractor I have is amazing optically but its an f/7 instrument, which means imaging nebulae and galaxies takes considerable imaging time. I had read about the Vixen RS200 Newtonian, which is an 200mm f/4 Newtonian (800mm FL). It looked good on paper but the price was more than I wanted to spend, and it looked like I'd have to replace the focuser, which meant even more money.
Recently I came across this review of the GSO 200mm f/4. My 10 inch f/5 Newtonian, with which I've had great success, is most likely a re-branded GSO OTA, so I thought this might be a viable alternative. I started to seek more information about this telescope. It seems in Europe is has a following but not so much in the USA. When I found a comparison of the Vixen RS200 and the GSO 200mm f/4 my interest increased considerably. Finally someone commented that Smartastronomy.com may have a few remaining. I found out the price was $350 and my decision was made. I have seen eyepieces that cost more than that!
Once I received the telescope I had a good first impression. Its amazing the bang for the buck you can get these days with telescopes. The supplied rings fit securely and bolted right onto my Losmandy dovetail. The mirror cell looked well designed. The secondary is mounted in a holder, unlike some other cheap Newtonians where I've seen it just glued on. The focuser had a good feel to it but was it was clear it would be too tall to provide enough backfocus for my cameras. The tube is steel like most cheaper Newtonians. The OTA is nice and compact and I've had it on my Unistar Deluxe alt-az mount without any problems from the size or weight.
I had no difficulty collimating the scope with my laser collimator. The system is just like my larger Dobsonian. The secondary has a large screw in the center to allow you to rotate the mirror perpendicular to the optical axis, and three smaller bolts to let you tip the mirror for collimation. The primary has three bolts for angle and three others which you tighten down to hold the mirror in place.
I setup a small artificial star and did proceeded to test the OTA in the early morning. I discovered there was some astigmatism in the system. I rotated the primary mirror and thankfully discovered it was not the cause. I suspected the secondary mirror because of the orientation of the elongation. I removed the secondary and saw it was held into the secondary holder by a clip, and had some sticky pads behind it. I suspect the mirror was being warped over the pads, as I have read this is a common problem with cheaper Dobsonians. I reassembled the secondary holder and tightened the clip with less pressure than it had initially. This seems to have addressed the issue as I have not noticed any problems in my astrophotos.

I tried to reach focus with both my Canon Rebel Xt and my SXV-H9. Neither would reach focus on the Moon. This meant I needed more backfocus. In order to do this I first upgraded the focuser to a Moonlite CR1. My 10 inch Newtonian has this focuser (a motorized version) and it is very well made. The Moonlite was shorter than the stock focuser but I still was not able to reach focus. So the next step was to push the primary mirror up into the tube further by using longer collimation bolts. Mine were 50mm long and I bought matching springs to replace the existing ones on the mirror cell. I also bought 50mm restraining bolts as well. Installation was very easy and now I was able to focus both the Canon Rebel and the SXV-H9. One caution - if you screw the collimation bolts in too far you will start putting pressure on the back of the primary mirror! I used standoffs on the collimation bolts because they were too long. The new bolts are pictured to the right.
The rings supplied with the GSO 200mm have a single threaded hole centered on the bottom. This allowed me to attach a Losmandy dovetail, which is more than adequate for the weight of the OTA. Unfortunately the rings do not allow one to attach a guidescope piggyback. I had been considering a tandem arrangement for some time so this was a good opportunity to try it out. I purchased a tandem plate from Scopestuff and mounted a Robin Casady saddle on one end. At the other end I mounted dual 3.5 inch guidescope rings to hold my Orion ST80 guidescope. The GSO 200mm slides into the saddle using the previously attached dovetail.
The system works extremely well. I need less counterbalance weight because the guidescope is closer to the axis of rotation. Also the tandem arrangement allows me to better balance off-axis to compensate for the awkward position the camera must be mounted at when imaging with a Newtonian. My imaging mount is an Orion Atlas EQ-G (also known as a Skywatcher EQ6), with a specified weight limit of 40 pounds. The GSO 200mm plus rings and dovetail weigh 23 pounds. The tandem arrangement with guidescope and imaging camera comes in at 37 pounds. I have found this to be a very sturdy imaging platform which I've autoguided at 1200mm (pixel size is 1.2 arc-seconds square) without any difficulties.
First light for the telescope was with a Meade DSI-C. It was immediately obvious that I was going to have to motorize the focuser because to reach focus required me to apply slight pressure until I could just perceive motion! This is a consequence of the extremely small zone of critical focus inherent to a f/4 focal ratio. I was able to get an image of M13 that looked promising. the collimation of the scope appeared to hold extremely well across the sky. Flexure appears to be a non-issue. Now I just needed to wait until another clear night to pull out my more serious imaging equipment.
One disadvantage to fast Newtonians for imaging is that there is off-axis coma. On my 10 inch f/5 Newtonian I had used a Baader MPCC successfully to address this problem. The MPCC is a lens system that compenstates for the coma. You simply thread it onto the front of the camera you want to use and then insert the MPCC into the 2 inch focuser and secure. For the best image quality you must have the proper spacing between the MPCC lens and the imaging chip (55mm). For DSLRs this is the builtin distance from the T-ring to the chip, at least for my Canon Rebel. For the SXV-H9 I had to add about 13mm of spacers to reach the proper distance.
From my experience previously with the DSI-C I realized I would need to motorize the focuser. I had an extra Robofocus stepper motor and a shaft adapter for my FS-60C. After some tinkering and a trip to the hardware store I came up with this solution. It worked great and backlash is minimal.
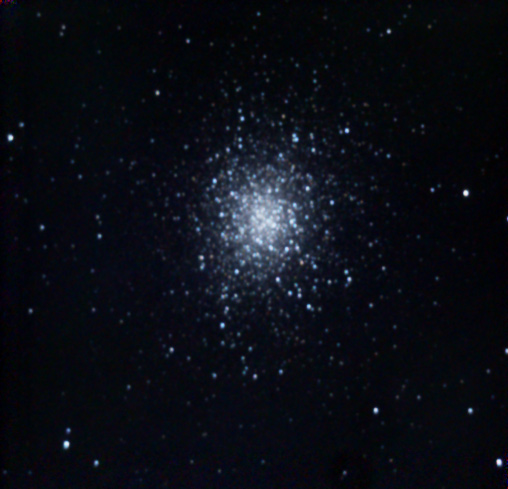
Conditions were not optimal the night I took the data for M3 (pictured). This time of year haze begins to be a common problem. However I was pleased with the ability to resolve the core, (see an enlarged view), and there did not seem to be a problem with bloated or irregular shaped stars. Also vignetting was minimal and this is because the GSO has a 2.6 inch secondary which is large enough to cover the 9mm chip in the SXV-H9.
I was concerned that the Baader MPCC might not be able to correct for the extreme off-axis coma in the corners of the 23mm chip of the Rebel Xt. Also vignetting was going to be more of an issue. What I found, however, was that coma simply was not an issue. Vignetting was about about a 25% dropoff in the corners relative to the center of the frame. This can be corrected by a flat field.
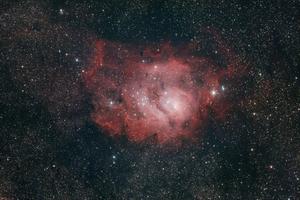
A wonderful aspect of this telescope is that it has a fast focal ratio of f/4. This image was taken from my backyard and M8 is fairly low in the direction of considerable sky glow. I would estimate the sky is around mag 3.5 down there. However this is only a 22 minute exposure! On my TEC 140 APO with a focal reducer I can shoot at around f/5.4. Since the pixel scale is the same for the two telescopes (FL ~ 800mm), the number of photons/sec per pixel is (5.4/4)**2 greater for the GSO than the TEC. The TEC setup would require 180% more exposure time to reach a similar signal level.
My favorite imaging scope has been my DBA Astronomy 10 inch f/5 Newtonian. It is a very large telescope and I've been wanting a similar focal length in a smaller package. I realized that with a 1.5x Barlow the GSO 200mm f/4 could also reach a similar focal length. I ordered a Siebert Optics 1.5x Barlow and tried it out. It is a 2 inch Barlow so I simply inserted into the focuser and then mounted my camera with a 2 inch nosepiece. I did not use the Baader MPCC for these images.

The first image is of the open cluster M11 (Wild Duck Cluster). This is a wonderful cluster in the middle of a massively dense starfield which I had previously imaged at 135mm with an old SLR lens. Seeing conditions were not optimal and this affected the size of the stellar profiles. I was able to reduce the size of the stars using the common method of a minimum filter in Photoshop. Hopefully I will have better seeing conditions soon to test the optical configuration better.

The next image is of the well known nebula M16. The optical configuration was the same as for the M11 image above. I had even larger stellar profiles in this image but I believe it was because I had not focused carefully enough. The minimum filter helped but the stars are still quite large. However I'm very happy with the focal length I can reach with the barlow. There does not appear to be any blue bloat created by the lenses in the Barlow. This image has an exposure time of 30 minutes of R, 20 minutes of G, and 26 minutes of B, unbinned.
I believe I've found a fast imaging platform for medium focal length. The price is fantastic and component quality is good. The optics appear to be more than adequate for the type of imaging I am interested in performing, though I did have to replace the focuser and install longer bolts for the primary mirror support to achieve focus. A Baader MPCC is necessary for imaging with a chip much larger than a DSI-C or DSI camera; however, even with these modifications the price was considerably less than other fast Newtonians. It is important to understand you will not be able to image straight out of the box. An exception to this would be if you are using a small chip like the DSI-C, which worked extremely well in stock form.
Another small issue to consider is that the supplied rings do not have threaded holes on the top, so it is not possible to mount a guidescope on top of them. I solved this problem by using the tandem arrangement shown at the top of this page. If you would like to mount the guidescope piggyback you will need to buy a different set of mounting rings. I tried the Orion rings for their 8 inch Newtonians and they were slightly too large. I suspect if you wrapped the OTA with corkboard you could get these to work.
I would recommend this telescope to anyone who likes to tinker and is interested in a medium focal length telescope. It costs less than many of the new crop of small refractors and should have enough light gathering ability to keep exposures short. This in turn reduces the demands on guiding and makes imaging alot more fun and rewarding.